CSS Image Maker
The purpose of this tutorial is to provide some basic CSS coding that can be used position images on a page in specified locations.
The images may placed on top of each other or to the right or left of each other or above or below each other.
The positioning is up to the artist's artistic vision. Once placed the opacity of each image can then be adjusted to produce the desired effect.
An identifier must be assigned to each element to be positioned and named inside the
<Style></Style> tags located in the Head section of your document.
The # sign is the identifier used which is followed by the { curly bracket and the co-ordinates of identified element and a closing }
The co-ordinates are specified in pixel sets and denote the distance left from the top left of the page and the distance down from the top of the page.
The identifier takes the following format.
# pic1{ position:absolute;left:100px;top:350px;z-index:5; }
which are the co-ordinates of the image you see on the left. The
div tag is then used to execute the identifier and place the element in the specified location.
<div id=pic1><
img src="profteach.gif" width=138 height=126 alt="prof">
# pic2{ position:absolute;left:1100px;top:350px;z-index:2; }
<div id=pic2><img src="blackboard.gif" width=138 height=126 alt="board">
# pic3{ position:absolute;left:1100px;top:500px;z-index:3;opacity:0.3; }
<div id=pic3><img src="dust.gif" width=138 height=126 alt="chalk dust">
# text{ position:absolute;left:100px;top:550px;z-index:4; }
<div id=text><table><tr><td>dusty blackboard</td></tr></table>
Z-index
The
z-index property specifies the stack order of an element.
An element with greater stack order is always in front of an element with a lower stack order.
Note: If two positioned elements overlap without a z-index specified, the element positioned last in the HTML code will be shown on top.
Note-2: The default
z-index is 1. A negative value may be assigned and is used by the professor when a
full screen option is provided as an option.
CSS Opacity / Transparency
The opacity property specifies the opacity/transparency of an element. The opacity property ranges from opacity:0; Transparent to opacity:1; Opaque not able to be seen through; not transparent. Opacity values are indexed in tenths The first digit to the right of the decimal point; one out of 10 equal parts of a whole.
With the opacity set at opacity:0.1; You see 90% of elements in an elements that are in a lower order.
With the opacity set at opacity:0.9; You only see 10% of elements in an elements that are in a lower order.
The Assembly
Now that the stacking order has been determined, assembly of the elements can begin. The opacity of the chalk dust will be applied when the assembly has been completed. The blackboard is moved to begin the assembly demonstration.
left:1100px;top:350px;
- Add chalk dust to the blackboard
left:1120px;top:1050px;
- Add text to blackboard
left:860px;top:1050px;
- Set dust opacity
left:720px;top:1050px;opacity:0.3;
- Locate the pointer
left:410px;top:1095px;
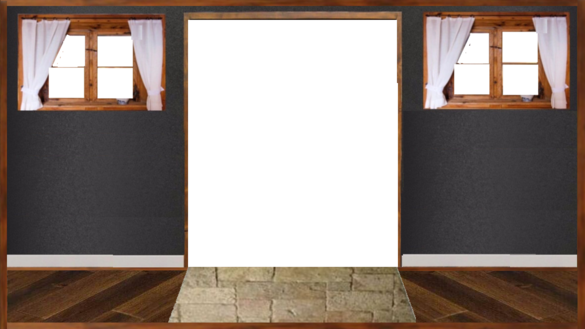
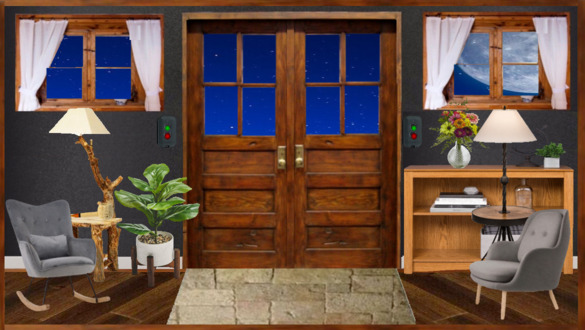
The Project
Now lets produce a CSS image using the info we have learned from the above examples. The
KEY is selecting the proper
stacking order for the project with opacity added to any element at any time during assembly. The example uses 3 elements but any number may be used. Here is an example where 7 elements were added to produce the Winter Cabin. The image on the left is the cabin shell. The image on the right is the cabin which was obtained by taking a
screen shot from
The Winter Cabin page that it is on.
The Winter Cabin | |
 |  |
The Template
Here is a template with the element, described above, and the code necessary to display them. Replace the data where indicated by the comment tags. These tags will not be displayed in he finished project. Copy the template, enter it in the Professor's
HTML Testbed,and select
preview to see finished project. If the results are not satisfactory, just close the window and you will be taken back to your coding.
The Result
We now have to snag the produced image once the you are satisfied with it. Just follow these simple steps.
- Take a screen shot of the results page
- Go to the Online Image Editor and select Upload Image
- Select crop from the menu
- Move and adjust red outline to area t be cropped
- Select Apply from left panel to save choice
- Place pointer on result and right click
- Select Save image as
- Give it a name and save it
The resulting image will now be saved in the selected folder which can now be uploaded to a server of your choice.
Your image can be made transparent at the Editor if a solid color was used as a background when making the image.
- Select Advanced from the top menu
- Select Transparency from the choices
- Follow the instructions on left panel
Well that about does it and good luck with your imagery.